Plume主题增强之目录功能引入和样式优化
介绍
基于 @vuepress/plugin-catalog 插件,实现以下功能:
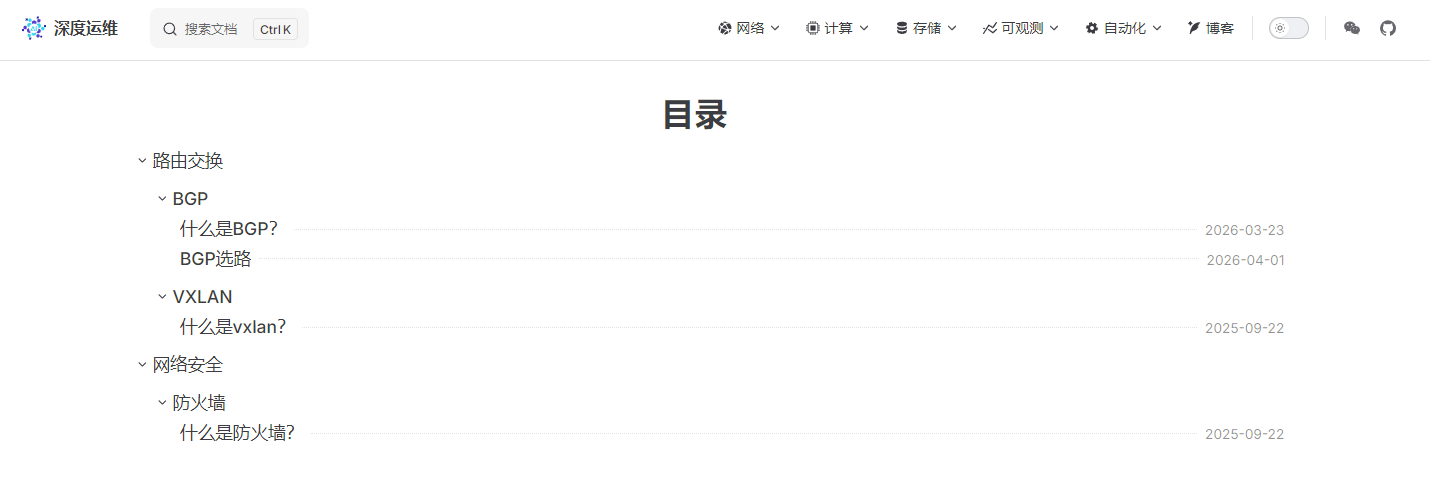
- 自动生成目录页:无需在每个目录下手动创建 README.md,插件自动为所有目录生成对应的目录索引页
- 目录标题自动大小写还原:VuePress 会将路径片段小写化,通过扫描文件路径自动还原原始大小写(如
H3c → H3C) - 目录标题手动映射:支持将目录名映射为自定义名称(如
Routing-switching → 路由交换) - 时间显示:每个目录条目右侧展示创建/更新时间,标题与时间之间用虚线连接
- 折叠功能:文件夹类目录可点击折叠/展开,带旋转箭头图标
- 侧边栏自动折叠:进入目录页时自动折叠侧边栏,给目录更多展示空间
- 纯文本目录样式:去除默认装饰,呈现简洁的纯文本目录风格
效果预览
项目结构总览
docs/
└── .vuepress/
    ├── components/
    │   └── CatalogEnhance.vue   ← 新增:目录增强组件
    ├── config.ts                ← 修改:添加 catalogPlugin 插件和 extendsPage 配置
└── client.ts ← 修改:注册 CatalogEnhance 到 rootComponents| 文件 | 操作 | 说明 |
|---|---|---|
docs/.vuepress/components/CatalogEnhance.vue | 新增 | 目录增强组件,包含时间显示、折叠功能和样式 |
docs/.vuepress/config.ts | 修改 | 添加 catalogPlugin 插件,并在 extendsPage 中注入 createTime、updateTime 到路由元数据 |
docs/.vuepress/client.ts | 修改 | 将 CatalogEnhance 添加到 rootComponents |
实现过程
1. 时间显示 — defineCatalogInfoGetter
@vuepress/plugin-catalog 提供了 defineCatalogInfoGetter 钩子,允许在客户端自定义每条目录条目的渲染内容。这里用 Vue 的 h() 函数手动构造一个 flex 布局的标题行:
defineCatalogInfoGetter((meta) => {
  // 取 updateTime 和 createTime 中较晚的一个
  let finalTime = meta.createTime
  if (meta.updateTime) {
    const isNewer = new Date(meta.updateTime) > new Date(meta.createTime)
    if (isNewer) finalTime = meta.updateTime
  }
  const formattedTime = finalTime
    ? finalTime.split(/\s|T/)[0].replace(/\//g, '-')
    : ''

  return {
    title: meta.title,
    order: meta.order,
    // content 是一个渲染函数,替换默认的标题文字
    content: () => h('span', { class: 'vp-catalog-title-wrapper' }, [
      h('span', { class: 'vp-catalog-title-text' }, meta.title),
      h('span', { class: 'vp-catalog-dotted-line' }),       // 虚线
      formattedTime
        ? h('span', { class: 'vp-catalog-create-time' }, formattedTime)
        : null,
    ]),
  }
})
对应的 CSS 让标题、虚线和时间三者用 flexbox 排列,虚线 flex: 1 自动填充剩余空间:
.vp-catalog-title-wrapper { display: flex; align-items: center; width: 100%; }
.vp-catalog-dotted-line   { flex: 1; border-bottom: 1px dotted var(--vp-c-divider); margin: 0 0.5em; }
.vp-catalog-create-time { font-size: 0.85em; color: var(--vp-c-text-3); }注意:
defineCatalogInfoGetter必须在模块顶层调用(即<script>而非<script setup>),确保在组件实例化之前执行一次。
2. 折叠功能 — MutationObserver + CSS 相邻兄弟选择器
目录的 HTML 结构是由插件在运行时生成的,无法在模板中提前绑定事件。因此在 onMounted 中用 MutationObserver 持续监听 DOM,每当新的 .has-children 元素出现时,立即为其注入折叠图标和点击事件:
const initCatalogCollapse = () => {
  const folders = document.querySelectorAll(
    '.vp-catalog-child-title.has-children, .vp-catalog-sub-title.has-children'
  )
  folders.forEach((el) => {
    if (el.dataset.collapseInit === '1') return  // 防止重复初始化

    // 在标题内插入箭头图标
    const wrapper = el.querySelector('.vp-catalog-title-wrapper')
    if (wrapper && wrapper.firstChild) {
      const icon = document.createElement('span')
      icon.className = 'vp-catalog-collapse-icon vpi-chevron-down'
      wrapper.insertBefore(icon, wrapper.firstChild)
    }

    // 点击切换 collapsed / expanded class
    el.addEventListener('click', (e) => {
      e.preventDefault()
      e.stopPropagation()
      const isCollapsed = el.classList.contains('collapsed')
      el.classList.toggle('collapsed', !isCollapsed)
      el.classList.toggle('expanded', isCollapsed)
    })

    el.classList.add('expanded')    // 默认展开
    el.dataset.collapseInit = '1'
  })
}
子目录的显隐完全由 CSS 的相邻兄弟选择器控制,不需要额外的 JS 操作:
/* 当父目录有 collapsed class 时,隐藏紧跟其后的子目录列表 */
.vp-catalog-child-title.collapsed + .vp-child-catalogs,
.vp-catalog-sub-title.collapsed + .vp-sub-catalogs-wrapper {
  display: none;
}
3. 侧边栏自动折叠 — 防闪烁处理
进入目录页时直接调用 toggleSidebarCollapse(true) 会触发侧边栏的 CSS 过渡动画,造成「先展开再收起」的视觉闪烁。解决方案是在调用前先给 <html> 加一个临时 class,CSS 针对这个 class 禁用过渡,布局稳定后再移除:
watch(() => route.path, () => {
  // 1. 立即禁用侧边栏所有过渡动画
  document.documentElement.classList.add('catalog-transition-lock')

  nextTick(() => {
    if (document.querySelector('.vp-catalog')) {
      toggleSidebarCollapse(true)  // 2. 折叠侧边栏(此时无动画)
    }
    // 3. 等两帧后恢复动画(确保布局已完成重绘)
    requestAnimationFrame(() => {
      requestAnimationFrame(() => {
        document.documentElement.classList.remove('catalog-transition-lock')
      })
    })
  })
}, { immediate: true })html.catalog-transition-lock .vp-sidebar,
html.catalog-transition-lock .vp-content {
transition: none !important;
}4. 目录标题自动大小写还原 — dirNameMap
VuePress 在生成路由时会将路径片段全部小写化,导致 H3C 变成 h3c、CAS 变成 cas,目录页标题显示异常。
在构建时用 Vite 的 import.meta.glob 扫描所有 .md 文件路径,从真实文件路径中提取目录名,建立小写 → 原始名称的映射:
const dirNameMap: Record<string, string> = {}
Object.keys((import.meta as any).glob(['../../**/*.md', '!../../.vuepress/**']))
  .forEach((filePath: string) => {
    filePath.split('/').slice(2, -1).forEach(seg => {
      dirNameMap[seg.toLowerCase()] = seg  // h3c → H3C, cas → CAS
    })
  })
在 defineCatalogInfoGetter 中用 dirNameMap 还原标题:
const rawTitle = meta.title as string | undefined
const title = (rawTitle && dirNameMap[rawTitle.toLowerCase()]) || rawTitle || ''
所有逻辑均在
CatalogEnhance.vue中完成,config.ts只需在frontmatter回调中将 URL 片段作为原始 title 传入:frontmatter: (urlPath) => { const segment = urlPath.replace(/\/$/, '').split('/').pop() ?? '' return { title: segment, pageLayout: 'page', copyright: false, isCatalogPage: true } }
5. 目录标题手动映射覆盖 — titleMap
对于需要中文化或特殊命名的目录(如将 Routing-switching 显示为「路由交换」),自动大小写还原无法满足需求。在 titleMap 中手动维护映射,优先级高于自动检测:
const titleMap: Record<string, string> = {
  'Routing-switching': '路由交换',
  'Security': '网络安全',
}
结合 dirNameMap 的完整解析逻辑:
defineCatalogInfoGetter((meta) => {
  const rawTitle = meta.title as string | undefined
  // 1. 自动还原大小写(h3c → H3C)
  const autoTitle = (rawTitle && dirNameMap[rawTitle.toLowerCase()]) || rawTitle || ''
  // 2. 手动映射优先覆盖(Routing-switching → 路由交换)
  const title = titleMap[autoTitle] || autoTitle
  // ...
})
使用方法
第一步:安装依赖
pnpm add @vuepress/plugin-catalog第二步:修改 config.ts
在 docs/.vuepress/config.ts 中添加以下内容:
import { catalogPlugin } from '@vuepress/plugin-catalog'

export default defineUserConfig({
  // 将页面元数据注入路由(供组件读取时间信息)
  extendsPage: (page) => {
    page.routeMeta = {
      title: page.title,
      order: page.frontmatter.order,
      createTime: page.frontmatter.createTime,
      updateTime: page.frontmatter.updateTime,
    }
  },

  plugins: [
    catalogPlugin({
      frontmatter: (urlPath) => {
        const segment = urlPath.replace(/\/$/, '').split('/').pop() ?? ''
        return {
          title: segment,
          pageLayout: 'page',
          copyright: false,
          isCatalogPage: true,
        }
      },
      exclude: [/^\/Blog\//], // 按需排除不需要目录的路径
    }),
  ],
})
第三步:新增组件文件
将 CatalogEnhance.vue 创建到 docs/.vuepress/components/ 目录下。
第四步:修改 client.ts
在 docs/.vuepress/client.ts 中添加以下配置:
import { defineClientConfig } from 'vuepress/client'
import CatalogEnhance from './components/CatalogEnhance.vue'

export default defineClientConfig({
  rootComponents: [CatalogEnhance],
})